Make-ahead Breakfast Sandwiches!

I made an amazing discovery – did you know that you can freeze and reheat breakfast sandwiches!? So of course I had to try it! I made eight of them and froze six. I just ate the first one and aside from the fact that I over-toasted the top of the muffin it worked out quite will!

This will help to ensure that I have food for the upcoming week. How did I make them?

  1. Caramelized some onions with sage, thyme, and pepper. I didn’t add salt because the bacon and cheese will do that for me later. I poured a dozen eggs (beaten)* on top and baked that whole concoction for about 20 minutes. Who knew that it took such a hot oven (450F) to bake eggs?

*although next time I will use 10 eggs.

2. It takes a slightly lower oven to cook bacon (375 F) but takes about as long. Bake it and put it on a paper towel to drain. That’s what’ll crisp it up. Also, do this on the top rack of your oven for greater success. I had to do some re-arranging mid-way through. You may prefer vegan bacon, (coconut bacon, tempeh bacon), peameal (Canadian), or none at all. All are fine. They’re your sandwiches, after all.

3. Toast your English muffins just a little bit. You can use the lower rack in your oven while you cook the bacon up top.

4. Assembly. Each muffin contains: 1/8th of the onion-egg (is this a frittata?), a slice of bacon broken in half (some got a bit extra) and a couple slices of cheese. Layer in standard sandwich format.
 Sorry for the weird perspective here! (I had to wedge in beside the fridge to take this picture).

Wrap each sandwich individually in tinfoil, put them together in a (clear) bag, and freeze. To reheat them take the tinfoil off and put your muffin on a paper towel. I microwaved it for 90 seconds but I think I’ll try reducing that to 75 or even 60 seconds the next time. I toasted the top half of the muffin in the toasted oven. I thought that I’d like the crunch but the texture was too different. I need to reduce the time there, too.

Pretty delicious, though! And now my breakfast woes are solved!

Pancakes!

Specifically, banana-buckwheat pancakes (or buckwheat-banana pancakes). I used this recipe with modifications; firstly I doubled the recipe so that I’d have enough for the freezer (so that I can have breakfast during the week). And because I had two bananas that were going. I also used more milk than she suggests (possibly up to 1/3 more – not entirely sure as I went by eye) and I replaced the last cup of buckwheat flour with whole wheat flour instead.

I ate them with jam on top. Success!!

Pot Roast: day two


Now it’s time to add the vegetables!

After cooking all day I added potatoes, carrots, and pearl onions. This is where the weakness of my cookbook was really apparent. I thought that 45 minutes in a slow cooker wasn’t quite long enough for potatoes – and I was right! Both they and the carrots were hard even though I gave them extra time. Veggie fail! In the future I will pre-cook my vegetables. That’s a tip, kids.

At the very end I added peas and corn. The corn needed to be added because it was going bad; I’d gotten 5 corn for a dollar at the grocery store for that reason. The rest will go into the chili that I want to make in the next few days.

This is what it looked like before I added the gravy:

wpid-IMG_20150828_211932_edit.jpg

Ready to eat

And then, with gravy on my plate and ready to go:

wpid-IMG_20150828_212846.jpg

My first attempt at making meat and potatoes!

American Pot Roast


For some reason my cookbook differentiates between American pot roast and Italian. The difference seems to come down to pancetta (Italian) vs mirepoix (American – who knew! I thought it was French!) as the main seasoning. So I started it tonight, because pot roasts were 30% off at the grocery store. Which, when you find meat at the store that’s 30% off, you need to cook it post haste. So I started tonight. I’ll finish tomorrow. Thus far it looks like this:

image

Would you believe that there’s a pot roast under there?

Thus far you’re looking at a pot roast (hidden underneath the gravy) which after being dredged in flour, salt, and pepper, was browned in butter for ten minutes. Then the mirepoix was cooked in the same browned butter with a teaspoonful of thyme and sage (I love these two!) and a pinch of rosemary. Then more flour as a thickening agent and three cups of veggie broth. I was supposed to use beef broth but I don’t keep that lying around. So that’s the gravy.

Tomorrow it’ll cook for eight or nine hours (can you overcook a roast? I hope not as I have some errands to do) and have pearl onions, potatoes, and peas added to it at the end. Planning ahead for post-work dinners!

Would you believe that I’m about as organised as a real grown up?

Taco Salad Skillet

Tacos are one of my favourite foods. But I’m spoiled and the hard shells from the grocery store just don’t do it for me. Unfortunately for my taste buds ever since I moved away from having a tortilleria a mere two blocks from my house (now it’s almost two kilometers away!) I eat them less frequently. Enter the amazing budget bytes and her wonderful Taco Salad Skillet! I’m saved!

Mine ended up being vegetarian because I didn’t feel like going to the store. So it had pinto beans and corn (you can see them peeking out the bottom) and was topped with avocado, tomato, a shredded romaine heart, and green onion.

wpid-IMG_20150803_190555.jpg

I ended up adding a lot more spices, too. I hadn’t yet gotten around to getting chili powder (that whole not going to the store thing that I mentioned earlier) so instead I used cumin, and a bit of oregano. A jalepeño helped as well.

wpid-IMG_20150803_190801.jpg

Oh, and as a final embellishment, sour cream! I needed it for that jalepeño.

Buckwheat Pancakes

image

I’ve been told that buckwheat flour is very hard to find in the US – if that’s true please let me know! I buy it at the local food co-op and then keep it in my freezer for sudden pancake cravings.

It’s strawberry season now. I don’t like to eat out-of-season berries. They’re too sour as they don’t develop their sugars when they’re forced to ripen against their will. Yes, even berries have free will and they don’t want to be eaten out of turn. So that means that when the berries are in season I have to eat as many as possible to make up for the 11 months of the year that I haven’t been eating this particular kind. The yellow is mango because I’m worried that I’m catching a cold. I’ve spent way too many days riding through rainstorms on my bicycle these past few weeks.

So this morning I woke up and walked to the store to buy strawberries, eggs, yoghurt (I use it instead of milk for these pancakes) and milk for my tea. On the way back I stopped along the way to eat mulberries. This was my reward for my productivity 🙂

This recipe makes enough for two people. If you want to try it too it is:

  • 1 cup yoghurt
  • 1 egg
  • 1tsp vanilla
  • 3 tbsp melted butter

Combine these in a small bowl. Start preheating your frying pan (especially if it’s cast iron like mine). In a slightly bigger bowl combine:

  • 6 tbsp flour (I used whole wheat because it’s what I had on hand)
  • 6 tbsp buckwheat flour
  • 1 tbsp sugar
  • pinch salt
  • 1 tsp baking soda
  • dash cinnamon, nutmeg, clove, or other savoury spice that you like in your pancakes
  • I added in 2 tbsp of wheat germ because I think that wheat germ is important. This is optional. If you do this add a little bit of extra yoghurt to make up for the dryness.

Make a well in the bowl of ‘dry’. Pour the yoghurt mixture into the well. Using a scoop-stir method combine the wet and the dry. Do not overmix!

Melt some oil (I use coconut) in your frying pan. Using a 1/4-cup measuring scoop (or a very large spoon) dollop out the pancake batter into the pan. The trick with these is that they don’t seem to bubble around the edges the way that normal pancakes do to say “flip me!” so just keep an eye on them every few minutes. While they’re cooking chop your fruit. You will be much happier with fruit on your pancakes.

I keep mine warm in the toaster oven while I wait for the rest of the batch to cook. That way I have warm pancakes when it’s time to eat!

Food in Jars! (part 4)

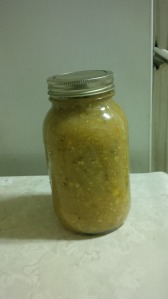
A mason jar on a white counter against a white background.  It is full of thick pale tan liquid with pieces of corn and green flecks suspended in it.

This is my first attempt at potato-corn chowder. Given that I don’t really like potatoes, how did this come to be? Here’s how:

My friend has been telling me all about the wonders of fridge preservation so I thought that I’d give it a try. Having a two-day snowstorm (the edge of what hit Buffalo, NY) made me really want wintry food. So I decided to go with soup. Partly because she spent about 40 minutes singing its praises, and partly because it’s an easy and wonderful winter food. Also because I’d bought corn on sale from the grocery store a few days prior and it really needed to be used up. I had some aging potatoes in my fridge, and some sad jalapeños kicking around. So potato-corn chowder it was to be!

Here’s how I made it:

  • sauté onion, garlic, celery in some olive oil. I could have added a carrot as well, but I didn’t.
  • throw it in the slow cooker along with chunks of potato, the corn, some red pepper, and the jalapeños. Those were all the veggies that I had in my fridge.
  • added the broth that I’d made a few days before (and used as practice preserves). I also added some smoked paprika because it smelled good.
  • before going to work in the morning I turned it on, leaving strict instructions to Fuzzy that he was to turn it off at a pre-arranged time. I also texted him a reminder.
  • it sat in my fridge for a few days
  • you’ll notice that I didn’t add any salt. Later on (upon tasting) I threw in some Bragg’s, some soy sauce for good measure, and some worcestershire sauce just for added assistance. They barely made a dent, but at least it’s not impossibly bland.

Today I canned this (resulting in two jars) and turned them into fridge preserved soup. Given that I have a couple of very hectic weeks coming up and am seemingly incubating a cold, it’s nice to have something to look forward to. I’m also already planning some other soups that I’d like to make, including tomato-bean soup, and carrot-couscous. At this rate I’ll have to make more broth base first!

Dessert and Sunday Night Breakfast

Today after work I went to my mother’s dessert party. I finished the trifle (as I mentioned the other day) that I started yesterday. Her neighbour made the chocolate bundt cake behind it. This is the best chocolate cake that I’ve ever had. It’s an old recipe, too.

Dessert!

Roasted pear and raspberry trifle. The slivered almonds on top are hard to see!

The trifle was so popular that I was requested to make another one for Thanksgiving (which is in two weeks). I don’t want to make the same one. Perhaps pumpkin? The same neighbour who made the chocolate bundt cake always hosts Thanksgiving, and she requested it. How could I turn her down, when she can bribe me with chocolate cake!?

It was popular!

It was popular!

Once I got home I had to make my breakfast for the week. This week my fridge has lots of raspberries, and I have some bosc pears as well (leftovers from making a pear-raspberry trifle!). So I decided to make slow cooker oatmeal. I haven’t had it for a while, and I have some early mornings and long days coming up. Plus it’s a perfect autumn food (well, really, it’s also perfect in the winter and spring). It reminds me a lot of rice pudding (which I love!), although the grain is different. Here it is waiting for a final stir:

Raw oats floating in their cooking liquid inside of a crockpot, shown with a wooden spoon for stirring them in

Slow cooker oatmeal, pre-cooking.

How do I make my slow cooker oatmeal? Like this!

  • Grease the crockpot, otherwise the final product will stick to it pretty badly! I like using coconut oil because it tastes good. Any other oil or fat would work just as well, like as not.
  • Pour in your liquid. Steel cut oats use a grain:liquid ration of 1:4. So 2 cups steel cut oats requires 8 cups of liquid. I use 6 cups of water and 2 cups of a milk substitute. This is math!
  • You’ll also want to add a bit of sugar (1/4 cup) and stir it in until it’s dissolved. This is unless you prefer to add it to individual portions, of course. I like adding it to the cooking because then I can tell Fuzzy that it’s pre-sweetened and he gets less sugar than he would if he free-handed it.
  • I always forget to integrate my spices properly. I use 1 tsp of vanilla and cinnamon, 1/4 tsp cloves, and either 1/2 tsp either nutmeg or cardamom depending on what I feel like at the time. Which might be why it reminds me so much of rice pudding! If you want to integrate your spices properly (apparently I don’t want to because I always forget to do this) put them (dry) in a cup. Add a spoonful of your water/milk liquid and stir well. You’ll get a form of spice paste. Put that into your 8 cups of liquid and stir it around again.
  • Now add your 2 cups of steel cut oats that I mentioned earlier.
  • Then I cook it on low for 8-9 hours. I’m told not to cook it for longer than 9 hours because it’ll dry out. So usually I make it and then wake up ten minutes early to turn it off and let it cool while I go about my morning routine.
  • I’m not sure how well it freezes, but I put it into containers and put it in my fridge. There! Breakfast for the week!
Breakfast

Breakfast